Friday, February 26, 2010

Beary's room update

 I *think* Beary's room is almost done!  We got rid of an old, boring bunkbed and made her this bed from knockoffwood's plans.  It was fairly easy, although we ran into some problems.  We couldn't find quality lumber at our Home Depot (small store) so ran into some issues sanding down the stuff we could find.  It's a little rough in spots, but we put those towards the back or inside.  And in our haste, we decided to paint in a 35 degree garage.  Not.a.good.idea.  Seriously, the paint was getting thicker by the second!  Soooo...we'll be more patient on our next project.
 Almost finished!  We added metal brackets to the inside corners of the frame to solidify it more.  Also, we fit dowel ends into the screw holes for a more finished look. (and to prevent random little toys from getting shoved in the holes)

This is a heavy, substantial bed!


Doesn't the princess canopy from this post look darling?

I also added some embroidery hoop art to the big empty wall, although I think I'll try to find some custom art soonish. 

She loves it!

Up next is this nightstand, that I got at a yard sale for $5. It was black with metal drawer insets.  Ick!  We painted it white for the moment, but I'm going to add beadboard to the drawer fronts.  There is a big gap between the drawer front and the drawer trim, and it looks weird!  

Linking up to my dear friend Nicole of Frontier Dreams giveaway.  If you haven't seen her blog, go take a peek!  She is simply amazing.  And I'm so glad she's on my side of the nation now!

Wednesday, February 24, 2010

CHEAP floor pillows!


My friend Charlotte and I were in IKEA Portland a week or so ago, and were perusing the as-is section.  (OMG how did I not know this existed before?!) They had this huge bin of what I can assume were the slipcovers from display couches and chairs.  They were marked $2.00 and $3.00!  I picked up three of the couch cushion covers in a durable cotton canvas, not quite sure what I was going to do with them.  I do this all the time, and it drives the Hubs crazy!  I have a huge pile of what I call my "recycled fabric" that is basically just random bits of clothing, sheets, scarves, etc. that I feel *may* inspire me someday.

So last night we're watching a movie and I go to get some nasty old pillows (you know you have some in your closet!) to lay on, and it hits me!  HELLO!  What better way to make floor pillows than stuffing these IKEA cushion covers with the stuffing from all of my old, lumpy pillows!  The whole reason we have don't have a bunch of floor pillows is because I'm too cheap frugal to buy the fill to make them.  (Gosh I can be so incredibly cheap FRUGAL about certain things--stuffing material being one of them.) 

So, move your tushes to IKEA (or that couch in your garage?) Wash those cushion covers, pull out your old pillows and get rolling!  Fluffing up that old matted pillow fill is a great thing for bored kiddos to do.  Just close your eyes and don't see the mess (if you're type A like me).  Then stuff!
 The girls' love these.  They're squishy and big, and they can fit their whole bodies on them!

The itsy-bitsy spider...

Honestly, why wouldn't you do it?  I got three huge floor pillows for a grand total of $7.00.

Sunday, February 21, 2010

Organize your pantry!

I picked up these spice jars and quart jars at IKEA a few weeks ago, with the intentions of making my pantry matchy-matchy.  (Oh Lordy I need to ease up on this coordinating OCD, don't I?)  I'd had all of my bulk goods in mason jars, and the spices were in their original plastic containers.  I hated opening the cupboard and seeing masking-tape labeled jars with rusting metal bands and lids that said something like "applesauce 2004" on them. I know what you're thinking: "Buy new bands and lids Jill!"  But that wouldn't be as cute, or as matchy!  So I transfer everything to the shiny new jars and then stand back to look at it all.  Huh.  Is that whole-wheat pastry flour or cornmeal?  And are those cranberries or raisins?  (no, I ain't blind!  But in a dark cupboard they all looked alike!) I needed labels. The wheels starting turning, and I remember I still have some chalkboard spray paint in the garage!  I'll make some adorable little matching chalkboards right on the jars.  Piece of cake, right?


I used a dry erase marker to mark the lines where the masking tape will go. (measure first or you'll end up off-center!)  Make sure you push the tape down really well!

Spray a couple of coats.  Remove the tape and use a fingernail or razor blade to scratch off any over-spray. (Umm...I think I need to do a better masking job next time.  THREE hours later my labels are "square")  Don't forget to prime your "chalkboards" by rubbing a piece of chalk sideways all over it then wiping off.

Enjoy your new matching pantry!  Oh, and yes, that is supposed to be a chicken.  You know: chicken bouillon? 

The Hubs said his "favorite" was the quick oats.  Huh? Why? Don't ask me.  He's a dork.

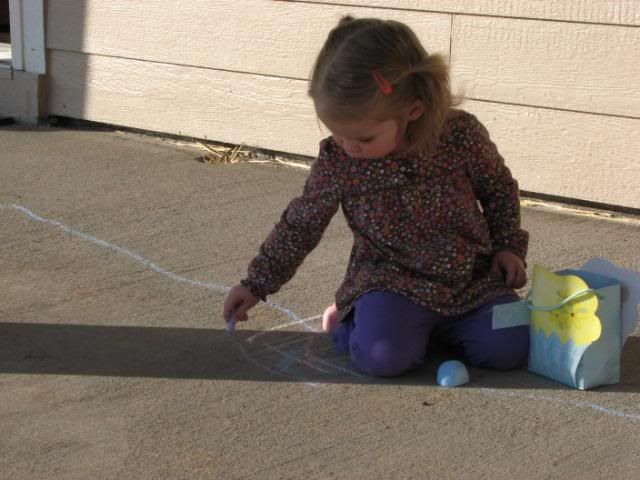
Wowsers, I need to invest in some normal size chalk!  Sidewalk chalk does not make it easy to write neatly!

I still have a lot more to do, but I love opening the cupboard and seeing all my little jars lined up in a row.  We do what we can to bring order in the chaos that is motherhood!

Stay tuned to see the other projects I've been working on!


Thursday, February 18, 2010

Lazy Days

  It's hard to focus on all the projects on my list when I'm so busy enjoying life!  I had to take a break from all of our "garage" projects to focus on other things.  V-day, a little trip to the city, the hubs b-day, and a few gorgeous days outside adding to our little piece on earth.  It was all worth it of course (especially those aspen trees), but I'm pooped!  And really, how could I accomplish anything when all of this was tempting me:
"weeding"


...all followed by a long, leisurely walk around town with my family and dogs.  I think days like these are God's little reminders of how incredibly lucky I am.

Friday, February 12, 2010

Project get 'er done: Part Four


 Project four: The doghouse

The kennel is right outside the back door, but in the winter I really don't like going out there to let the dogs in and out.  Maybe that's a bit lazy, but I hate the cold!  I had this idea, and my awesome Hubs not only did it exactly like I envisioned, but he made it like twenty times better.  The kennel backs the garage, and I thought that if somehow we could cut a hole through the siding into the garage, they could have an interior doghouse.  This would be doubly useful: I wouldn't have to go outside to let them in, and they would stay much warmer out of the elements.  We have large shelving all along the wall that backs the kennel, so we decided to build the "doghouse" under one portion of the shelving.  Here's a pic of it finished (minus paint)


He added a window so they could see into the garage, and the spoiled rotten brats even have double-thick carpet in there.  I figured that there would be some sort of tunnel going between the kennel and the garage, but Hubs used some extra siding and shingles to make a faux doghouse front!  How FREAKING CUTE is that?!

That step you see up is the foundation.  And we had to put something down on the little patch of dirt between the kennel and the foundation because Gus (the 90lb puppy) somehow found a way to dig.  He has also chewed a bunch on the framing of the doghouse.  The solution?  Chunks of log to chew instead. LOL!


Lucky dogs!

Thursday, February 11, 2010

Project get 'er done: Part Three


Part three actually happened during the Superbowl.  I am one of those people that CANNOT sit still and just enjoy myself- my hands must be busy at all times.  I've been wanting to practice with Bakerella's cupcake pops for a few weeks now.  I plan on making them in Boo's favorite flavors for her b-day party next month.  These I made with an almost-expired spice cake and cream cheese frosting, which was ok, but I'm a chocoholic, so I think I was a bit biased.

They were actually quite easy!  I think anyone could do it if they had a bit of free time.  I did find that letting the top frosting color rest a bit after melting is key, because it's way to runny right out of the microwave and when you flip your cupcake pop back over it all runs down the sides.  Bummer.


 Hehe.  I have way too much fun during naptime.
What I'll try next time:
Brownie pops instead of cake, and dark chocolate fudge frosting.  Mmmmm.
German Chocolate cake with coconut pecan frosting.  Oh gracious Ayla will love those!  She loves coconut!  And naturally, they will be hot pink and orange, because her party is going to be covered in hot pink and orange polka dots.

Wednesday, February 10, 2010

Project get 'er done: Part Two


Part two of project get 'er done is painting some little things I've had laying around forever!  Do you ever buy something (or find something!) with intentions of re-purposing it or painting it immediately, but find that three months later it's still sitting in your closet?  I do this all the time, and I'm so sick of unfinished projects!

I've had these little things for Boo's room for a while, and because I am currently re-doing her room in a shabby beach theme, I decided to paint them in vintage whites and sea-glass blues.  There is also a picture frame that somehow didn't make the pictures.  I recently picked up a Simply Shabby Chic bed-in-a-bag from Target (along with the matching flag banner!) on clearance.  LOVE it, and the colors are slightly more vibrant that they show online.  They look great with her faded green walls (think really pale sea-glass green) and the new matching accessories match perfectly!

 
This little caddy will hold the tea set she'll get for her birthday next month.

Gotta love these paper mache letters!

While I was at it, I painted another letter I had sitting around, this one to liven up our kitchen/dining area.  I used raw umber underneath and some aqua tinted with Christmas green on top.  Beary likes to "remind" me that our "wast name" starts with M!  I'm considering buying two slightly smaller m's to spell "Mmm" as it sits in the kitchen window.  But that could be another of Jill's dorky ideas!

Tuesday, February 9, 2010

Project get 'er done: Part One


Sorry it's been so long since my last post!  It's been a crazy few days around here.  You see, the way that the hubs and I operate is that we'll get an idea, or seven, in our heads and we absolutely HAVE to do it as soon as humanly possible.  Which means the two days we get together are filled with never-ending projects.  (I call this the DIY'ers curse)  Over the next few days I'll post what we've been up to.

In our head the last few weeks:
Photos courtesy of potterybarn.com
Feast your eyes on the Brady locker system from Pottery Barn.  We needed these for the garage (times three), and Knockoffwood had posted plans for them.  (I seriously love this woman)   Because they are *just* for the garage to hold coats, boots and the random handfuls of gravel and weeds, we made them from cheap plywood rather than dimensional lumber.  And of course, we couldn't exactly afford the $2400 price tag to have them shipped from good ol' PB.

Here is what one half of our garage looks like.  There is shelving all along the right side, but we're seriously needing some coat/shoe/dead flower/rock/bug storage!

So after....

I then...
 

Finally...

Hooray!

And they are currently getting a nice monotonous coat of "garage grey"

We changed a few things to minimize cutting the plywood, including making the back one piece rather than three individual pieces like she calls for in the plans.  We also made them only 48" rather than the 50" she had because we could cut a sheet of plywood much more easily that way.  And because we were using cheap plywood for the lockers, we added additional 1x2 trim to all visible edges.  Now I've just got to find some hooks and we're good to go!  For about $2300 less than PB. 
Related Posts with Thumbnails